AE6AC 17 meter Moxon

First a word of thanks to those who have put the effort into putting up the "Moxon Project" website. This is a great resource and hopefully a source of creativity and inspiration for many more to come in the future.
A friend of mine, Steve Hammer K6SGH introduced me to the Moxon Wire Beam antenna last year in 2004. He had a 17m Moxon hanging at about 35’ from a large eucalyptus tree in his yard. The antenna sounded loud but it is hard to really know what you are hearing until you put it up against something you have worked with for a while. I helped Steve build a 20m version using fiberglass crappie fishing poles, PVC fittings, 16 gauge wire and some fashioned Plexiglas insulators and I got the bug to build one for myself.
I have built 20m, 17m, 15m, and 10m, off-center-fed multi-band, ladder line multi-band, and a couple of 102’ G5RV’s dipoles. Lately my passion has been building center loaded vertical dipoles out of aluminum tubing. So building a wire beam was new to me. Building the Moxon was a lot of fun and even more fun when you put it up against your other antennas. The Moxon is very inexpensive to build and it really works well. As you will see in my project description there is lots of room for construction creativity and parts from your local hardware and fishing supply store.
Steve was kind enough to give me four 16’ crappie poles and enough high-grade silver plated copper wire to cut a 17m antenna. I used the Moxgen software designed by Dan Maguire - AC6LA to calculate my segment lengths. The software is shareware and is very easy to use. Figure 1 shows my calculated segment lengths. I cut mine for 18.135MHz which is one of my favorite frequencies.
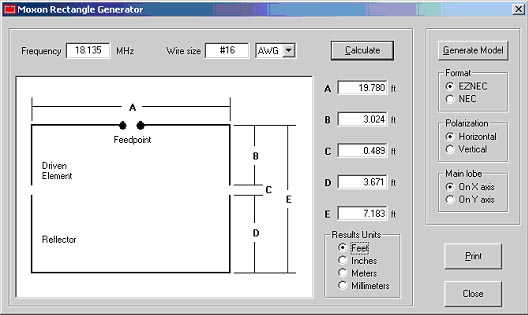
Figure 1, Moxgen program view showing calculated segment lengths.
Not wanting to miss cut my wire lengths; I converted the decimal dimensions using a quick spreadsheet that gave me the results in feet and inches (Unnecessary commentary; I think we missed a real opportunity to convert to the metrics system at the millennium 2000). For example dimension "A" is 19’ - 9" - 6/16" or 19’ - 9" - 3/8". Don’t forget to add an inch or two for wire loops at the end of each wire segment to the length before you cut.
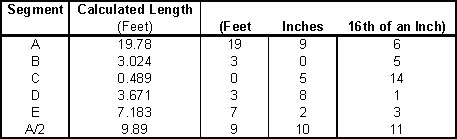
Figure 2, Moxgen wire segment lengths in feet and inches for 17m.
There are a couple of key decisions in making the Moxon using crappie poles. The first is how to join the poles at their bases. I found that ¾" schedule 40 PVC pipe fit perfectly into the crappie pole base when the rubber end guards are removed. Figure 3 shows a view of this section of the antenna. I used two "T" slip type PVC fittings slightly displaced vertically to make the hub. Initially, I did not cement the angular displacement of the fittings. I used standard fittings and the heavier schedule 40 PVC pipe. I found that the PVC pipe cement worked great for this as well.
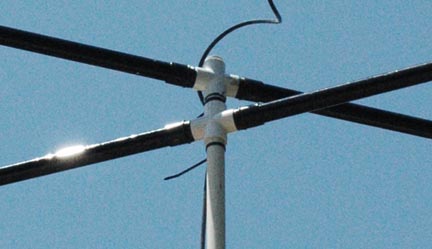
Figure 3, Center hub joining the Crappie pole bases using "T" slip type PVC fittings.
If you are unfamiliar with 16’ crappie poles, they are made of 5 fiberglass sections that slide inside each other. I found that I could get the length of pole I needed with one section removed. I removed the small end section of the crappie pole and worked with the sections from the grip to the second to smallest piece. The fiberglass at the pole end is very thin and somewhat fragile. A second key decision is how to attach the wire to the ends of the crappie poles. Staying with the fishing theme, I used Dacron cord and a fisherman’s knot to attach the cord to the pole end. The knot self tightens when the line to the wire beam is pulled. Figure 4, shows the fisherman’s knot at the end of the crappie pole.
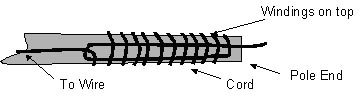
Figure 4, Dacron cord tied to crappie pole end using Fisherman’s knot.
At the wire interface I used a small wire loop to make a corner "eye" to attach the Dacron cord. I think this helps to keep the antenna shape and keep the corners from slipping at the attach point. Figure 5 show the wire loop tied in the corners. I soldered the winding of the small wire to further help secure the wire. Note that the main wire is continuous through the loop.
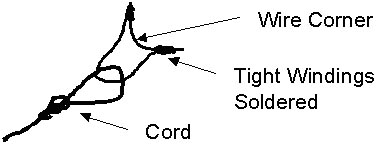
Figure 5, Wire loop used at wire corners to help keep wire shape and proportion.
The finished end point junction is shown below in figure 6. A small piece of Dacron core is used to attach the pole ends to the wire loop.

Figure 6, Detail for wire attach to Crappie pole end.
Sections "A" and "C" for the antenna are to be insulators. I used small fashioned Plexiglas pieces for this purpose. Figure 7 below shows a view of the section "C" Plexiglas.
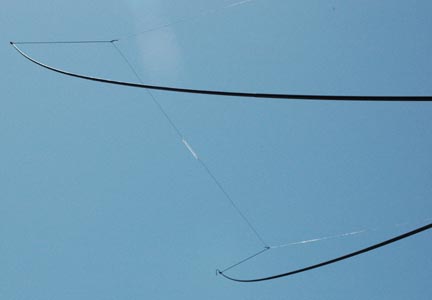
Figure 7, Section "C" Plexiglas piece.
After assembling all pieces and attaching the wire sections I re-measured each length and adjusted them as necessary. I let the center hub PVC fittings find their natural angles to accommodate the wire lengths as prescribed. I then cemented the fittings at this angle and tested the antenna. Figure 8 below shows the test configuration.
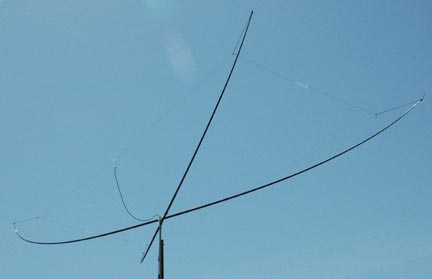
Figure 8, First test of my 17m Moxon.
The finished antenna is very light. I have not measured the weight but I would guess that it is less than 10 pounds. I mounted the antenna on top of an old fiberglass windsurfer mast and placed the vertical PVC section of the antenna down the hollow mast. I used a PVC slip-slip coupling to widen the shaft at the top of the mast to allow it to rest on top and rotate freely.
A 1:1current mode ferrite bead balun was mounted with cable ties near the hub of the Moxon crappie poles. The antenna shows an SWR of better than 1.5:1 into 50 coax across the 17m band as measured using the MFJ-259B. Front to back ratio is very good as I hear stations 10db over and 180 degrees out they were below S1 and in the noise. For a finishing touch I painted the PVC sections flat black and tied two Dacron cords to two opposing crappie poles for Armstrong rotational control. Crude but if you have the time it works. I also found these to be useful in windstorms as they allow the antenna to be tied down to a degree. The finished Moxon is shown in Figure 8 below. From the side, it is hard to see against the background, although I do occasionally see sun glint off of the crappie pole ends and the Plexiglas insulators.
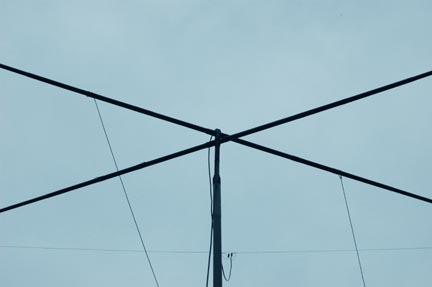
Figure 9, Finished 17m Moxon with flat black on PVC parts.
My first contact with the Moxon was a small net out of Australia with VK2AXB, ZF6GS in South Africa, and KL1M airborne mobile. I can switch in and out different antennas and so far I find this antenna is a real performer. I typically see 2-S to 4-S units or more difference from this antenna to my vertical dipoles. How much fun can you have with four fishing poles, a couple of PVC fittings and some wire and cord? Have fun building one for yourself.
73 Jim- AE6AC